
Security operations · 6 MIN READ · ASHWIN RAMESH · AUG 31, 2021 · TAGS: Cloud security / MDR / Tech tools
In the first post of this two-part series, we shared how our security operations center (SOC) spotted an Okta credentials phishing attack.
Now we’re going to do a deep dive into how we investigated the incident.
Before we jump in, it’s super important that we call out that you can prevent this type of attack by rolling out phish-resistant multi-factor authentication (MFA) like FIDO/WebAuthn in Okta. The tweet below, courtesy of @boblord is the right way to think about MFA.
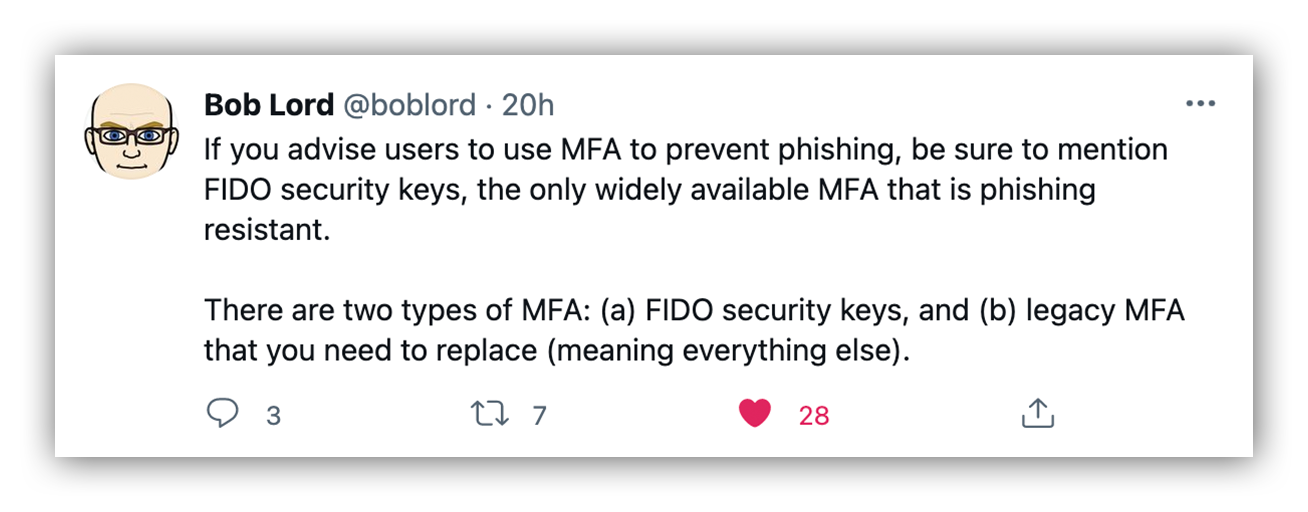
The man, the myth, the legend. Bob Lord (@boblord) and all of his wisdom.
Okay, now let’s talk about the investigation. A quick reminder that we can track the attacker’s activity by looking into Okta’s event logs. These logs contain all sorts of details like where a user is logging in from and what they’re trying to authenticate – to name a few.
Okta, by design, is an Identity and Access Management (IAM) platform used to delegate access to multiple applications used within an org. It uses the Single Sign On (SSO) authentication scheme to delegate access.
A compromised Okta account can lead to disastrous downstream effects, basically giving the attacker access to all the applications authorized for the victim.
But there’s good news: Okta maintains detailed event logs that we can search for using the Events API.
In this blog post, I’m going to walk you through the event logs we reviewed during our investigation, our decision-making process and how we used automation to discover what happened within five minutes.
Diving into logs
After we realized that we were dealing with a potential Okta phishing attack, we immediately started reviewing the customer’s Okta logs.
The image below shows an Okta event log.
Notice the event type is “user.authentication.sso.” This event describes a login to an authorized application using the SSO authentication schema. The application accessed by the threat actor was Google’s application suite (G Suite).
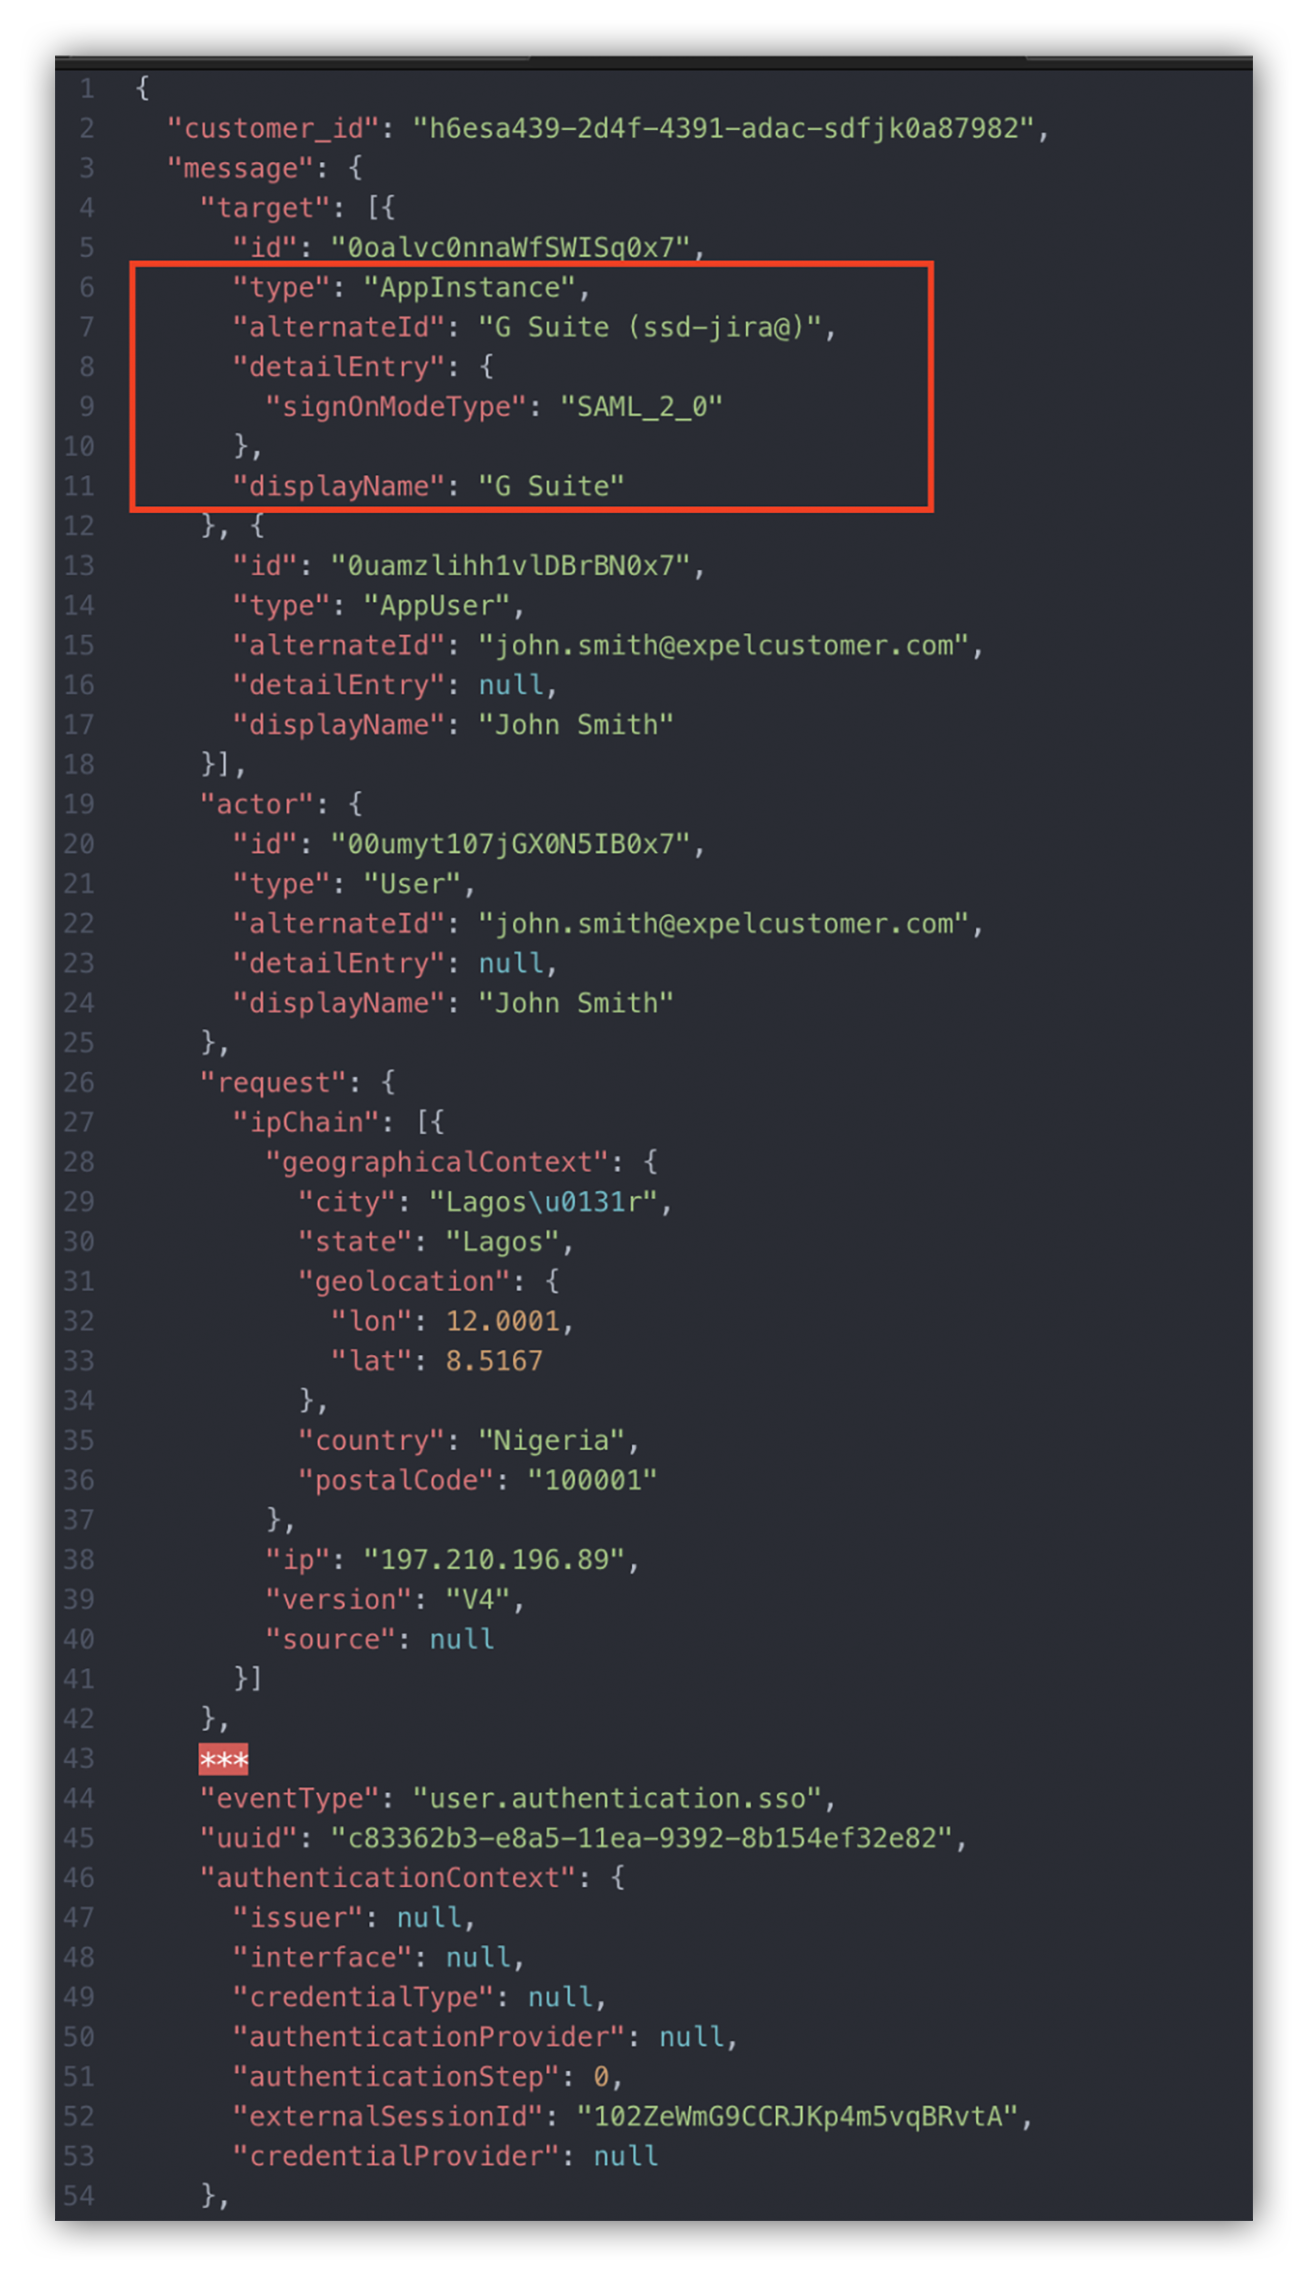
Okta log
This means that the attacker could access the victim’s G Suite applications that were authorized by their org.
That’s bad news.
At this stage, we knew we needed to comb through all G Suite activity logs. Exfiltrating data is the primary goal for this type of attack. So we started by looking at the victim’s Google Drive audit logs.
To dig deeper into these logs, we filtered on the value “drive” stored under the keyword “applicationName” within the event details.
Below is an example log of the external threat actor snooping around the victim’s Google Drive.
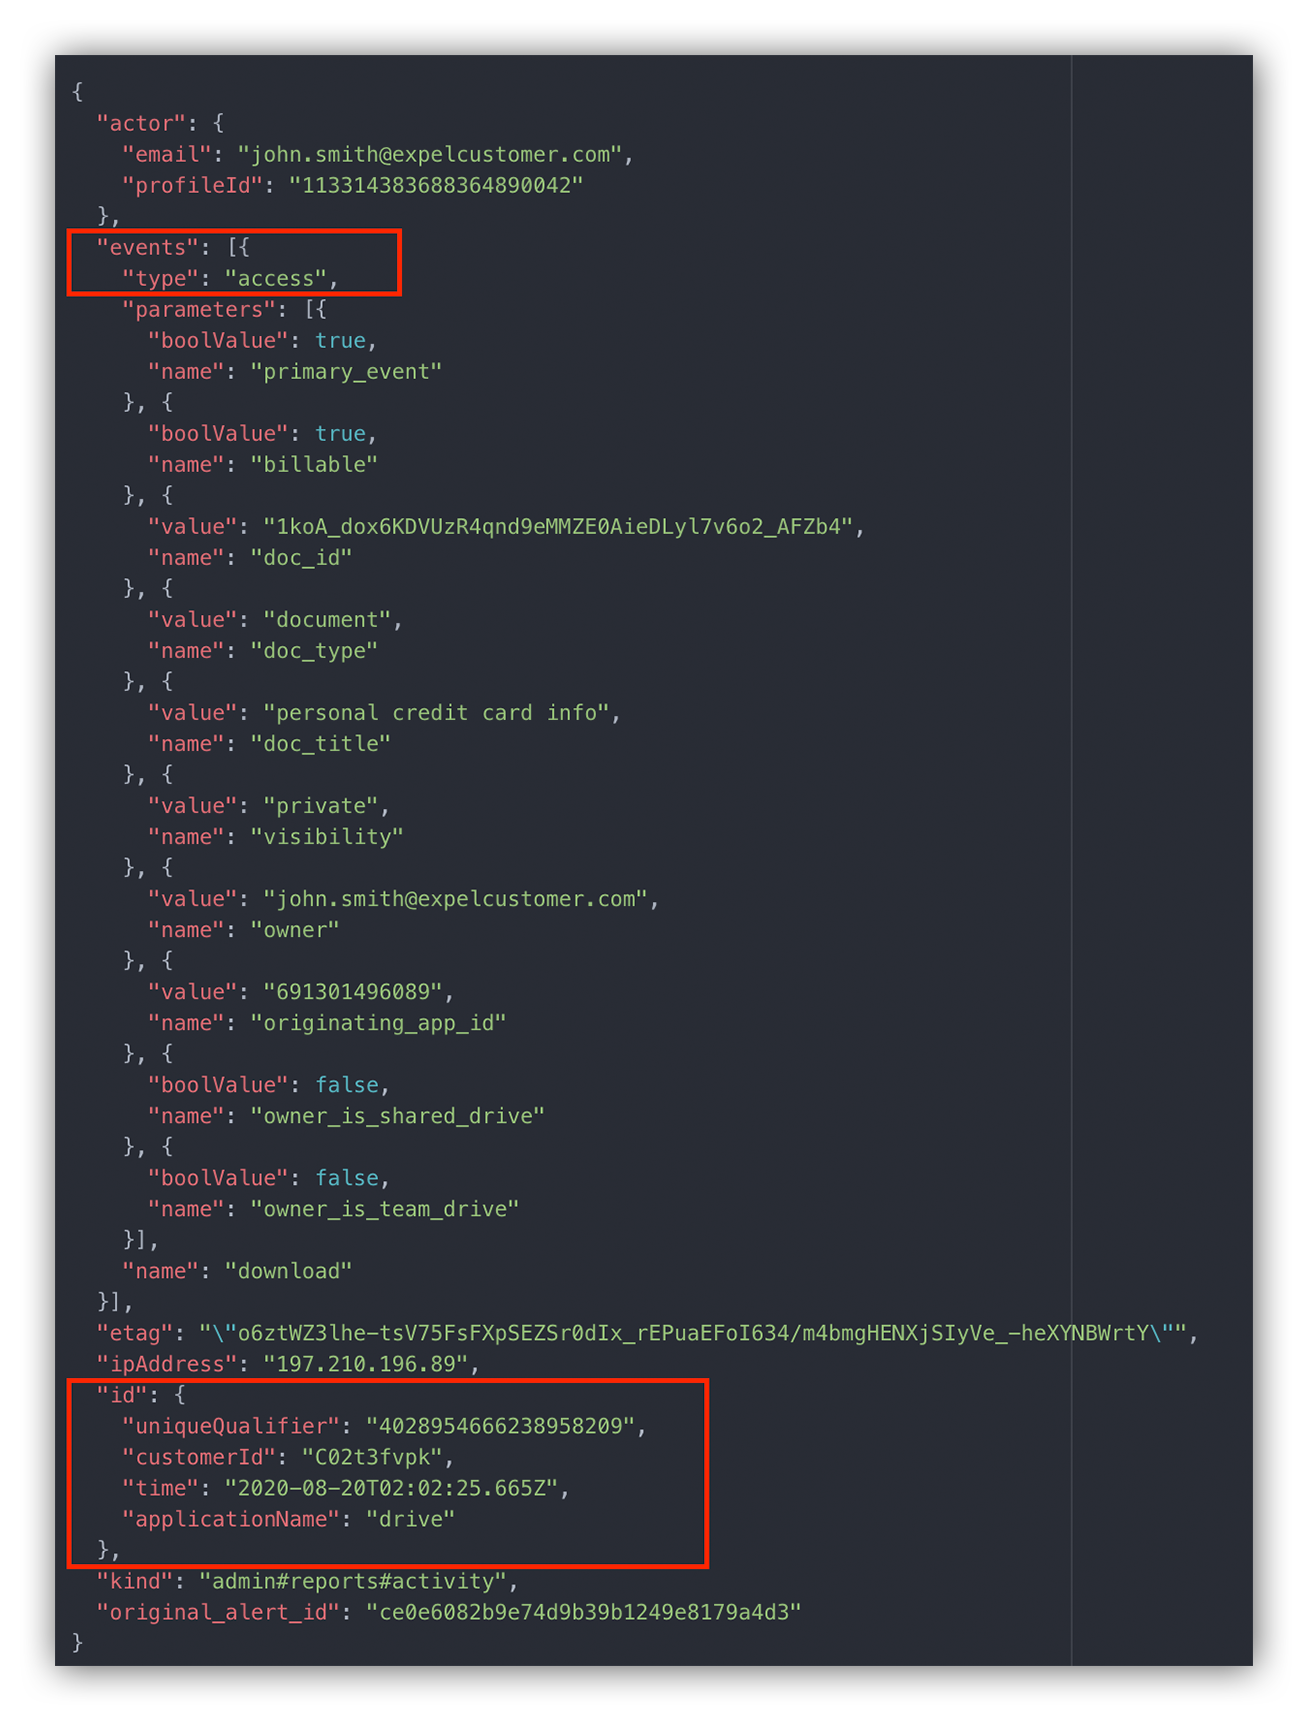 Google drive audit log
The “events” block within the event details gives us a lot of information to work with.
For example, we can see that the attacker downloaded a private document called “personal credit card info.”
Here’s a list of the event details that stood out to us, and what they mean:
- doc_title: This is the current title for the document.
- doc_type: This represents the document type – a DOCtype document in our example. Other possible values include folder, jpeg, mp4, pdf and spreadsheet.
- originating_app_id: This is the unique Google Cloud project ID of the application that performed the specific action. You can use the following resource to resolve the ID to a specific client. In our example, the ID `691301496089` represents the “Google Drive Web” client.
- owner: This is the email address of the file’s owner. In some cases, the owner can be the name of the Team drive for items contained within a Team drive.
- primary_event: This is a flag indicating whether this action is a primary event, or an event generated as a side effect of an associated primary event.
- visibility: This field describes the visibility of the file within the organization. Some of the different types of visibility include private, people_with_link and public_in_the_domain.
A detailed description of these keywords can be found on Google’s developer page.
Pulling it all together

Looking at the log event details helps us paint a picture of what the attacker was trying to accomplish.
Based on what we reviewed above, we noticed that the attacker was trying to download a personal Word document called personal credit card info from the victim’s Google Drive application.
This tells us that the attacker was actively snooping around for sensitive information. And when we see things like this – it’s time to alert the customer.
We immediately gave them their first set of remediation actions:
- Reset the victim’s credentials so the attacker can no longer use the compromised credentials.
- Force an account logout so the attacker can longer use Okta to sign into other authorized apps.
- Reset the account’s active sessions so the attacker can’t use existing access tokens to access authorized applications.
But we’re not done here.
There are still a few unanswered questions we had to chase, like: What else did the attacker download? Did they access other applications? Are there any other victims?
We could sift through the audit logs for Okta and Google Drive to answer these questions, but that would be a laborious process. By the time we’re done, the attacker would have wreaked havoc in the org’s network.
That’s why we’re big believers in automating things that can be automated. Luckily, I work with a great crew of engineers and we created automated workflows for our analysts.
Now let’s explore how we use tech like Expel’s bots to answer some of those questions above.
Automating workflows
Take it from me – sifting through logs in Excel is not easy on a hectic day. You can easily glance over key events and miss vital evidence during a security incident. Remember, every second you save helps keep your org safe from baddies.
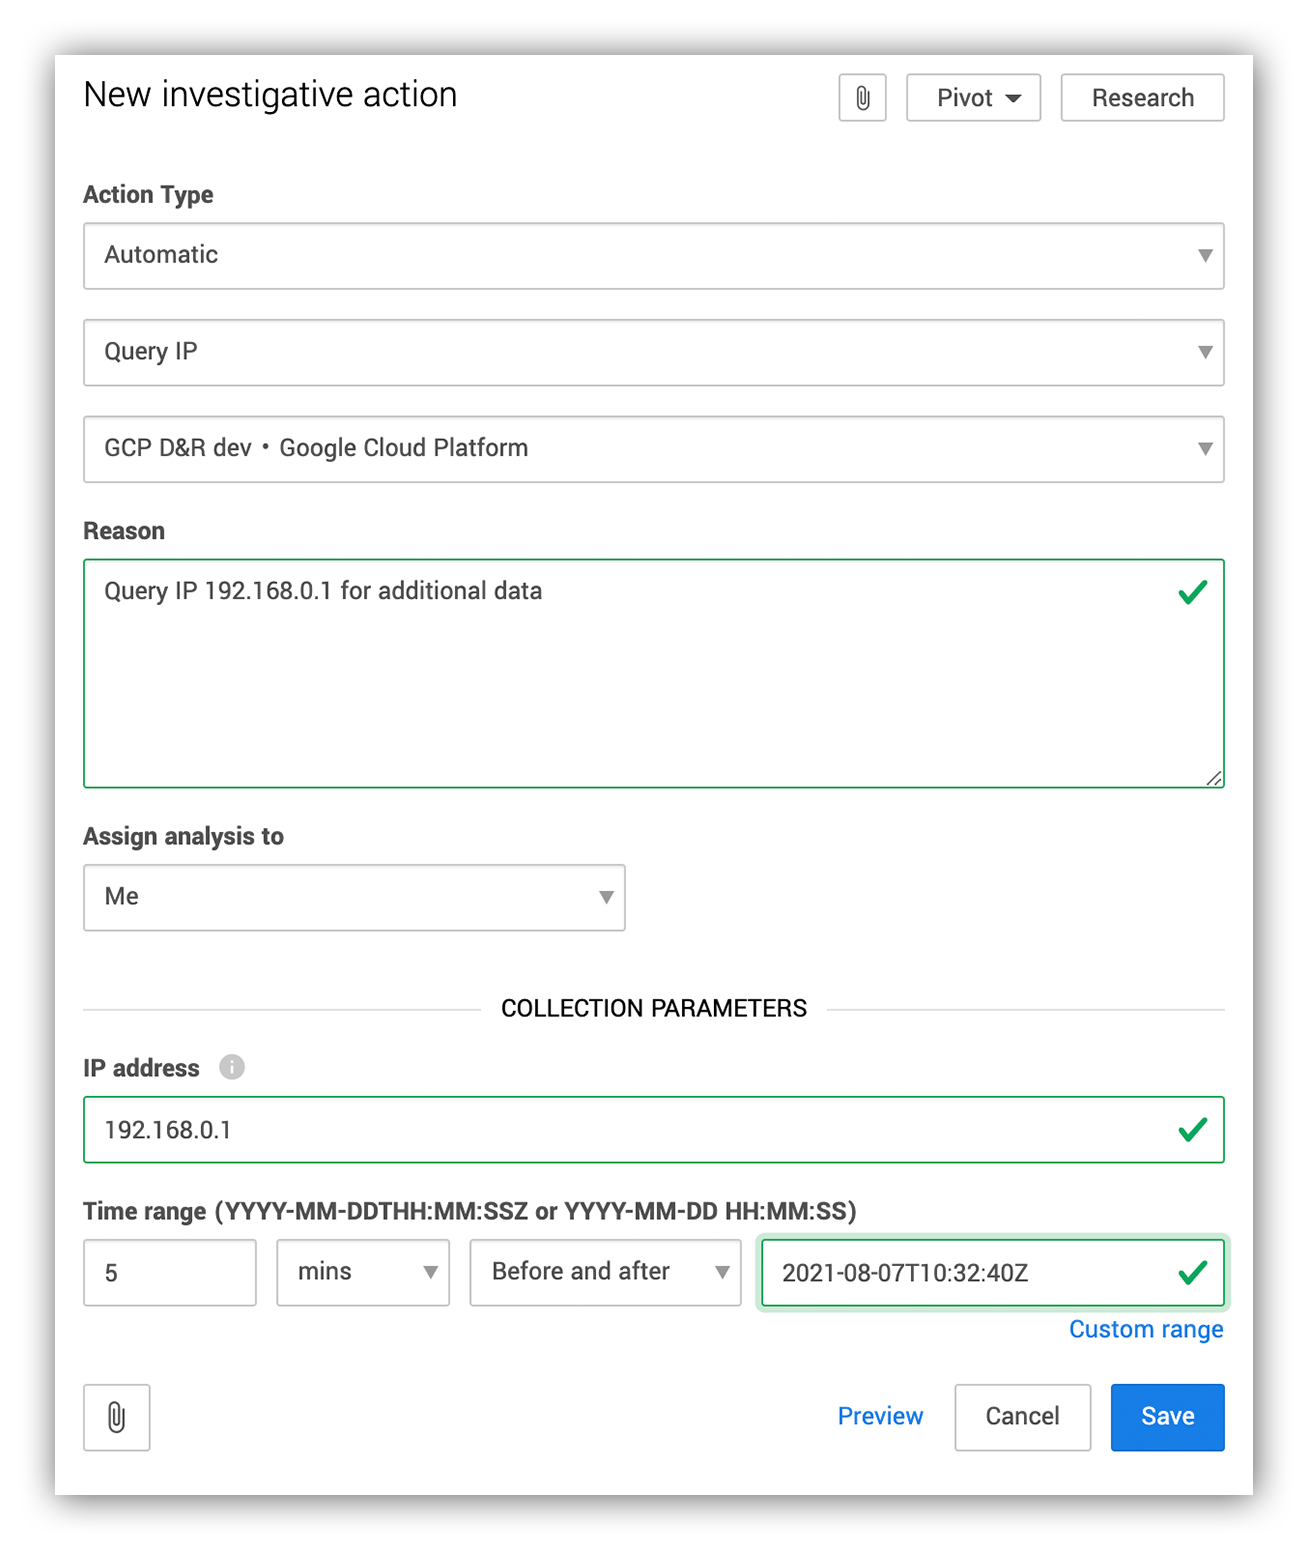
We use investigative actions to talk to the customer org’s security devices. During an investigation, an analyst issues an investigative action by providing the right set of parameters to retrieve additional data for analysis.
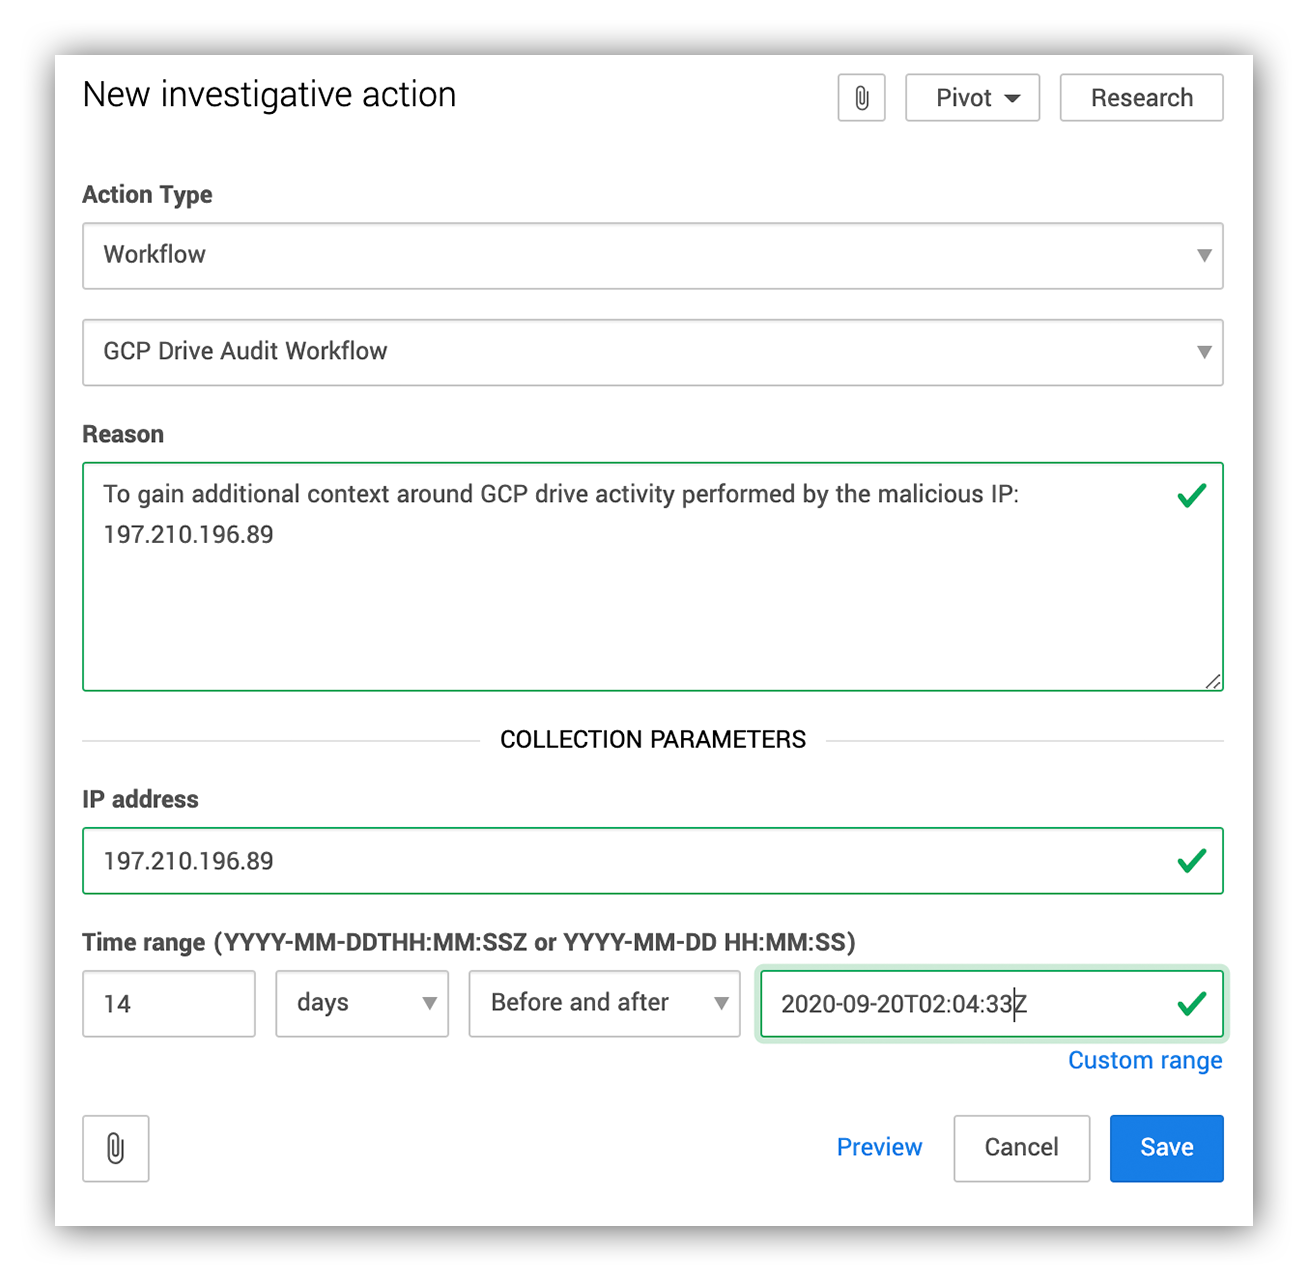
Below is an example of what entering these parameters into the Expel Workbench looks like.
Query IP Investigative action being triggered to query for any events associated with the IP 192.168.0.1
And below is an example of what the results of the investigative action would look like in the Expel Workbench™. Usually, the next step for the analyst is to either download the results and view them in Excel or view every event returned in the Expel Workbench data-viewer feature.
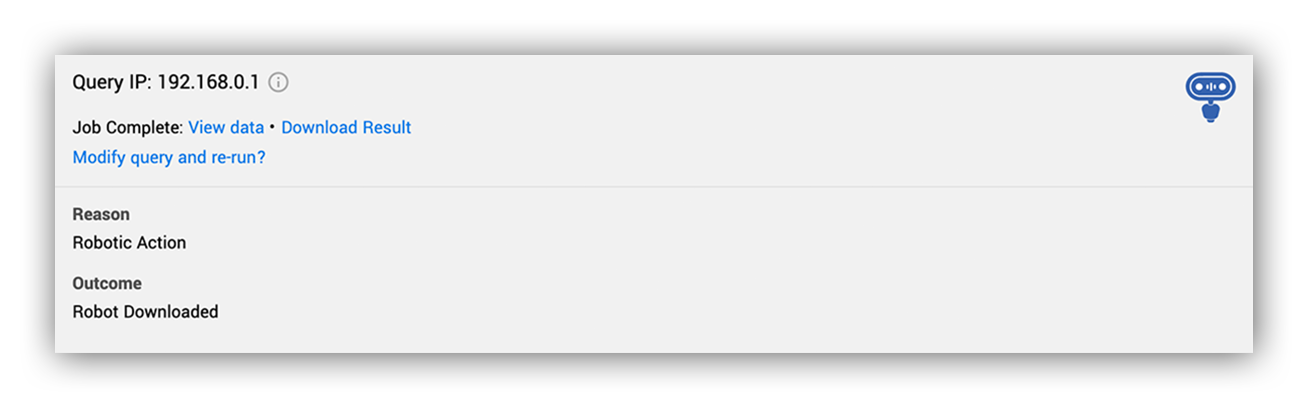
The query IP investigative action returning results from the triggered API.
During this investigation, we used our in-house bot, Ruxie™, to create an investigative workflow to gather all Google Drive activity from the malicious IP. The results were formatted into an easily digestible report, which was uploaded to the Expel Workbench.
Creating a workflow for Okta compromise
Based on our investigation, we could tell that the attacker used the malicious IP 197.210.196.89. From there, we used the GCP Drive Audit Workflow to quickly arm the investigating analyst with additional leads into other actions performed by the malicious IP within the org’s Google Drive application.
Take a look below:
Analyst triggering the GCP drive audit triage workflow.
Once we enter the investigative action details, we get workflow outputs like what you see in the two images below. This lets us see if the IP was used to log into other compromised accounts, what files were accessed by the malicious IP and what actions were performed on them.
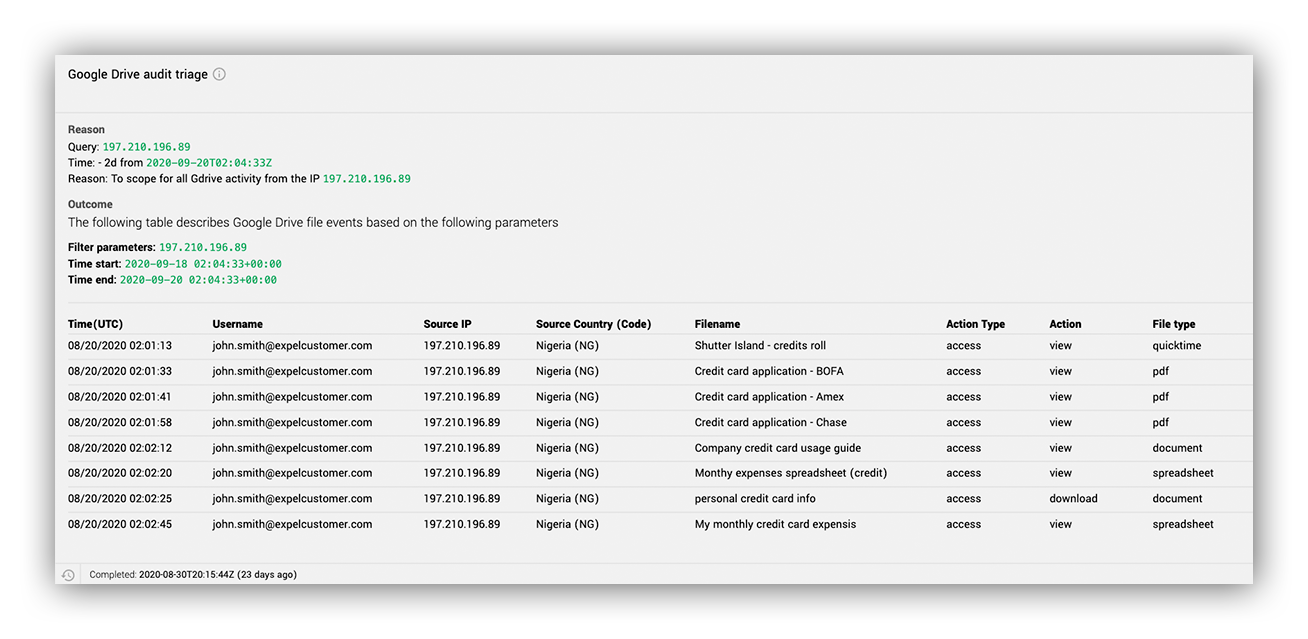
Google Drive audit triage workflow output
Within minutes, a list of file activity performed by the attacker from the malicious IP was uploaded to the Expel Workbench for the analyst to review.
The attacker managed to access a few files. Based on the names of the files in the images above, it looks like they were looking for any document associated with the word “credit” – fishing around for any sensitive data uploaded to the victim’s Google Drive account.
Once the analyst gathered this information, like with any investigation, we gave our customer a detailed report of the attacker’s activity within their org and how to remediate. These reports include:
- A list of all the assets the attacker touched;
- A list of all compromised accounts observed within the org;
- The root cause or the initial attack vector (when possible);
- A list of remediation actions; and
- A list of resilience actions to stop future threats.
Parting thoughts
Reminder: Phish-resistant MFA like FIDO/WebAuthn is how you beat the bad actors here. It would have prevented this attack. Attackers are getting better day-by-day – like using phishing kits that can defeat legacy Time-Based One-Time Password (TOTP) and push-based 2FA.
If this were to happen in your environment, the first thing you’d want to do is remediate the account’s credentials.
However, the attacker might have already gotten the necessary access tokens to maintain their access in the victim’s authorized applications. That’s why we recommend you force an account logout, as well as clear all the current active sessions associated with the account.
I hope you found this two-part blog series helpful. Still have questions about how we tackle phishing here at Expel? Find out more here!


