
Tips · 5 MIN READ · ALEC RANDAZZO · AUG 2, 2018 · TAGS: How to / Mission / Threat hunting
Remember the last time you moved to a new city? If it was before the smartphone era it probably took a little driving around to find the best grocery store, coffee shop and whatever other places you were looking for. That’s reconnaissance. And it’s the same thing a threat actor does after compromising a network.
Assuming they’re not an insider, once a threat actor gets a foothold in your environment they’ll need to get the lay of the land and learn more about the systems they’re on, the layout of your network and the network’s Active Directory. That’s how attackers figure out what systems and users they’ll have to target to accomplish their ultimate objective – whether it’s stealing data, stealing money or encrypting your data and extorting you for a ransom payment.
When attackers do reconnaissance (attacker tactic), they perform actions that aren’t things most users typically do (hunting hypothesis). Hunting for reconnaissance activity is the process of identifying those, often abnormal, activities. And when it comes to reconnaissance, time is of the essence. When you find a threat actor late in the game, it chews up a lot more time and money. Plus, the potential damage to an organization’s reputation is much higher. Ideally, you want to catch and stop a threat actor as early as possible so they can’t cause too much heartache. That’s why hunting for reconnaissance is important.
Where do you start?
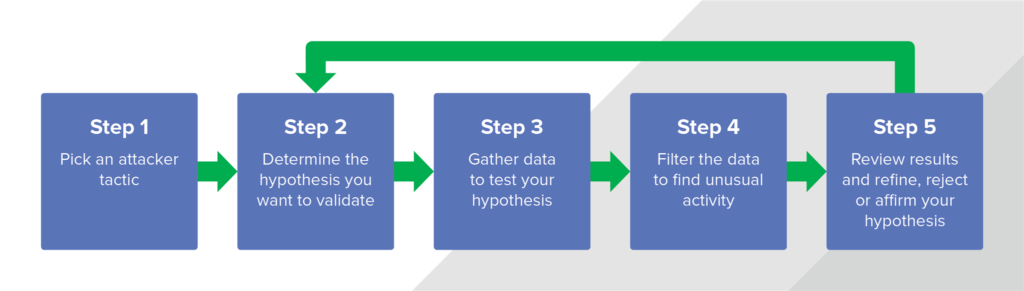
If you’re interested, more broadly, in how to hunt, check out our previous blog post, What is (cyber) threat hunting and where do you start? It outlines a five-step process that you can use for any hunting exercise. I’m going to walk you through, specifically how to apply that process to hunt for reconnaissance. I’ve already addressed the first two steps above, so let’s jump straight to step three.
Hunting process overview
Gathering data
There are a couple things you’ll want to consider as you figure out what data you need to gather to do your hunting. Of course, you want to make a list of the things you’re looking for. But that list will be constrained by your ability to go get the data. Usually, that boils down to the tools you’ve got to fetch the data. So that’s where we’ll start. In this example, we’re going to assume that we’ve got an endpoint detection and response (EDR) tool in place. At Expel, we use lots of different EDR tools including Carbon Black, Crowdstrike, Endgame, FireEye and Tanium. In this example, we’ll show the query for Carbon Black and Crowdstrike to gather the baseline data. But any of the above EDR tools are equally capable.
Next, we identify the tools that a threat actor could use to perform reconnaissance. We focused on built-in Windows tools that attackers can use to do discovery on the network, active directory, or local system. For instance, threat actors will heavily use Windows “net.exe” commands to query Active Directory in order to enumerate systems, users, and groups. We also focused on these tools being used from a command line process such as “cmd.exe” and “powershell.exe”.
The query below can be used in Carbon Black to return the processes that match our reconnaissance criteria.
(parent_name:cmd.exe OR parent_name:powershell.exe) AND (process_name:ver.exe OR process_name:tasklist.exe OR process_name:systeminfo.exe OR process_name:net.exe OR process_name:net1.exe OR process_name:whoami.exe OR process_name:qprocess.exe OR process_name:query.exe OR process_name:ping.exe OR process_name:type.exe OR process_name:reg.exe OR process_name:wmic.exe OR process_name:wusa.exe OR process_name:netsh.exe OR process_name:rundll32.exe OR process_name:sc.exe OR process_name:at.exe OR process_name:fsutil.exe OR process_name:nslookup.exe OR process_name:wevtutil.exe OR process_name:nltest.exe OR process_name:csvde.exe OR process_name:dsquery.exe OR process_name:nbtstat.exe OR process_name:netstat.exe OR process_name:qwinsta.exe OR process_name:vssadmin.exe OR process_name:tcping.exe OR process_name:netdom.exe OR process_name:certutil.exe OR process_name:bitsadmin.exe OR process_name:schtasks.exe OR process_name:ntdsutil.exe OR process_name:find.exe OR process_name:findstr.exe OR process_name:nbtscan.exe OR process_name:dsget.exe
The query below is the Crowdstrike equivalent.
ImageFileName="*ver.exe" OR ImageFileName="*tasklist.exe" OR ImageFileName="*systeminfo.exe" OR ImageFileName="*net.exe" OR ImageFileName="*net1.exe" OR ImageFileName="*whoami.exe" OR ImageFileName="*qprocess.exe" OR ImageFileName="*query.exe" OR ImageFileName="*ping.exe" OR ImageFileName="*type.exe" OR ImageFileName="*reg.exe" OR ImageFileName="*wmic.exe" OR ImageFileName="*wusa.exe" OR ImageFileName="*netsh.exe" OR ImageFileName="*rundll32.exe" OR ImageFileName="*sc.exe" OR ImageFileName="*at.exe" OR ImageFileName="*fsutil.exe" OR ImageFileName="*nslookup.exe" OR ImageFileName="*wevtutil.exe" OR ImageFileName="*nltest.exe" OR ImageFileName="*csvde.exe" OR ImageFileName="*dsquery.exe" OR ImageFileName="*nbtstat.exe" OR ImageFileName="*netstat.exe" OR ImageFileName="*qwinsta.exe" OR ImageFileName="*vssadmin.exe" OR ImageFileName="*tcping.exe" OR ImageFileName="*netdom.exe" OR ImageFileName="*certutil.exe" OR ImageFileName="*bitsadmin.exe" OR ImageFileName="*schtasks.exe" OR ImageFileName="*ntdsutil.exe" OR ImageFileName="*find.exe" OR ImageFileName="*findstr.exe" OR ImageFileName="*nbtscan.exe" OR ImageFileName="*dsget.exe"
Filtering the data
Once you run the above query, you’ll be rich with data. When we initially tested this hunting technique on a mid-sized network, we saw over two million results in a 30-day window. That’s more than any human could possibly review in a reasonable amount of time.
When you start to filter that data down, the trick is to reduce the volume of things you need to look at without diluting the value of the results. One way we do that is by looking for frequent use of these tools in a short period of time – specifically single command line processes which call at least three of these tools in a five-minute window. Why do we use this? Based on our experience, if a threat actor is trying to understand a victim’s network, it’s going to take more than a single command. They’ll likely have to execute several (or at least more than three) commands in any given five-minute window. When we apply this filtering logic, it reduced our dataset by 99.96 percent from over two million rows to about 800 rows. That’s a lot more manageable!
Reviewing the results
Now that we’ve shrunk the volume of data it’s pretty straightforward to review. We just need to remind ourselves of the questions we’re trying to answer. In this case, we’re asking ourselves “If I were a threat actor, what would this reconnaissance command get me and would that be useful if I was trying to learn more about my surroundings?” You’ll find that by viewing the data with that question as your lens you’ll be able to quickly write off a lot of the data as benign so you can focus on the things you’re going to want to dig into further. When you find something you want to dig into, you can use the process viewer in your EDR tool to get more insight into other processes that were spawned by that parent command line process. In our testing, it took an experienced analyst less than 30 minutes to review the results from this hunt. Given how easy it is to review the data and the high value it provides we didn’t need to refine it any further. Finally, if you do uncover malicious activity it’s a good idea to convert the process command line arguments into an alert trigger in your EDR tool so you’ll be immediately notified if it happens again.
That’s a wrap
So there you have it. If you’ve got an EDR tool that gives process-level insights give this technique a shot. We think it’s a pretty straightforward and effective approach to find attacker activity when they’re still early in the attack lifecycle. Happy hunting.


